Featured Post
Spectral Force & the 7DAC Team

Welcome to the 7DAC website. This site is being built as a repository of information about running your own 7DTD server. We will be supplying guides and help on the most common of problems admins may come across. Along with the aforementioned support, we are looking to provide links to resources for mods and modding…
As you look at the log for your server, it may seem a bit overwhelming or confusing at first. This guide will help you work through the information to find the important bits you are looking for. Initial Startup This is the first section you will see. It is loading up Unity and doing the…
It seems a lot more people are learning and setting up unraid to host their server. I’ve decided, due to the influx of neophytes, to write a guide to help out. As a note for any of Ich’s containers, it is best to have them on a cache drive. Any ssd or m.2 will do…
Read More “A Guide on how to install Ich777’s container (docker) on an Unraid server.” »
Winscp is a file transfer program similar to Filezilla. However it has scripting functionality we can use to set up a automated backup of a remote ftp server. Step 1 – Install WinSCP Download and install Winscp. You can find the download link Here Once installed you can enter your servers ftp details and use…
So you’ve been hosting your own server and now you’ve decided to host CSMM on your Unraid box as well. This is written assuming that you have a basic understanding of how Unraid and containers in Unraid work. In this article I will address setting up Ich777’s CSMM-7DTD container. First you will need to go…
Recently on the discord there has been questions about receiving donations and charging people for in game content or soft currency. TFP’s End User’s License Agreement (EULA) states the following: “SERVER DONATIONSAnyone who has purchased or has received a gift or press release copy of the game has permission to receive server donations from players….
Introduction In this guide we will walk you through the complete start-to-finish setup and configuration of a 7 Days to Die dedicated server on Linux. If you are looking at this, and are still up in the air about whether to choose Windows or Linux for you host OS, I’ll lay out some basics. Pros…
The maximum height a prefab can be is 255 blocks/metres high. While there is no hard limit as far as I know on width and length (If you don’t plan on using a distant mesh or want to use vanilla RWG* ), there is an issue that occurs with large prefabs with the distant mesh overlaying itself over the prefab while you’re inside it, instead of unloading. While it’s possible to overcome this issue, we’ll just keep things simple. Size obviously depends on what your building but the smaller it is the easier it will be. Try to aim for no larger than 100×100 if you want it to be compatible with the vanilla tiles and no greater than 200×200 for compatibility with vanilla RWG generator.
If you plan to place it manually, 169 is the maximum x & y dimensions while not incurring the distant mesh bug. This bug also depends on the clients view distance video settings, 169 is with it set to low so since that option is the lowest you can go in the options menu, that maximum dimension for x & y has the greatest accessibility for everyone.
If you want to spawn a prefab in a vanilla tile it has to be a specific size or it will not get spawned. The sizes are as follows (nothing larger than Medium will spawn in the downtown tiles):
Extra Small – 25 X 25
Small – 42 X 42
Medium – 60 X 60
Large – 100 X 100
Custom – Prefabs larger than 100 x 100 can only be spawned in the wilderness.
If you want to know more on the issues and gotchas with larger prefabs continue reading, if not you can skip to the “other limitations” section.
If you want to go larger than 169×169 users will have to select the medium view distance option in the video options. (assuming you want your prefab to have a distant mesh, obviously the glitch doesn’t apply if it doesn’t have one 😉 )
With medium you can take your prefab out to 202. Second to last is restricting your prefabs use to the high option, with it set to high you can do 234.
Even more?
yes if you really really want to, you can max out the games view distance with the console command “sg optionsgfxviewdistance 12” this isn’t a great plan, not only will every user have to enter that command every single time they launch the game (If on a server you can force the setting on them xd) it also means they might have to choose between lowering their view distance and deal with the bug, or leave it enabled and get poor performance. Also it goes without saying if your prefab is large enough to need this, there is no chance it will be compatible with vanilla RWG. Also also any prefab this large will take a ridiculous amount of time to make and make the game run very poorly.
However if you really, really, really want to do it, the absolute maximum you can stretch the x & y dimensions with the command is 364 while still not triggering the distant mesh bug. Anything larger than that will suffer from the distant mesh bug regardless.
Currently there is a ceiling of around 250-256 sleeper volumes before is starts acting buggy, but if you follow the size recommendations above you shouldn’t need to worry about it. Lights also have 2 limiting factors. 1 performance, lights are very taxing and lots of bright lights with a large range can quickly turn things into a slideshow. The 2nd factor is you can only have custom settings on a limit
Tiles that are manually spawned will not spawn their parts or prefabs. Furthermore switches, triggers & distant meshes will not function on a server if the prefab files are not installed on the client also.
There are several things you can do to improve performance in your prefab.
1. Lights
Using the “Show Light Perf” option in the debug tools tab you can see the range of all your lights. Try to ensure you don’t have multiple lights that overpass each other ranges. You can still have lights next to each other but for every 4 lights in a row you should set the other 3’s range to 0 they will still show as on but won’t incur the performance penalty.
2. Paint Textures
Make sure you don’t use the paint textures on blocks if the texture already exists as a default texture for an existing block. For example don’t paint anything with the wood texture if you can just use the wood block without any painting. This will reduce the memory consumption of the prefab.
3. Sleepers
For the best compatibility never spawn more than 25-30 zombies in a single volume or group of volumes. The default max alive for servers and single player is 65, if you reach that number sleepers will stop spawning in that volume until there is room in the cap. This leads to situations where the player will think a volume is cleared only to go away, kill some zeds that frees up the cap and then returns to find a bunch of zeds materialise in their face not great.
Also make sure you don’t over do the sleeper positions, for every 4 sleeper positions you should spawn 3 zeds. Only have about 25% more positions that will spawn.
4. Structural integrity
This should go without saying but you should always make sure your prefab is stable. If your prefab collapses ingame that has a huge performance impact, so make use of the playtest option and click “show stability” in the debug tools tab to see where your prefab has blocks that will collapse.
5. Trapped Zeds
Try to avoid having zeds enclosed behind solid blocks (trap blocks are fine since they only take 1 hit) for what ever reason damaging blocks has a big impact on performance, so having a bunch of zeds hammering at walls trying to get out will drastically reduce performance.
Once your in the prefab editor, first thing to do is press ESC and go to the last tab (Prefab Browser) Then “create new prefab”. You’ll be asked to name your prefab, so any name will do and it can be changed later. When renaming a prefab you can just rename the files of the prefab found in C:\Program Files (x86)\Steam\steamapps\common\7 Days To Die\Data\Prefabs
There will be a handful of different files for each prefab, just watch out for the .NIM file. It has a double extension and it’s easy to overlook. So don’t forget the .blocks or it won’t load.
YOURPREFABSNAME.blocks.nim
Now that it’s been saved you can press ESC and click on save at any point. I’d highly recommend that you create backups and keep the last several. So if something goes wrong or you make a design mistake, you have previous versions to revert back to.
The prefab editors bread & butter is the selection tool. You press Z and a blue box appears, press it again on another location and the box will fill the area between the 2 points. Using the selection boxes you can create walls in a couple seconds, limit other tools to a specific area, copy and paste entire sections (or even whole prefabs). You can change it’s size by holding SHIFT + G then drag the 3 arrows in the direction you wish to expand the box in. You can also move it by holding G then using WASD and SPACE for up and C for down.
You’re already in debug mode when you load into the prefab editor. So to open the creative menu just hit U. Here you can get all of the blocks you need. I’d recommend you use the mutiblock variant type blocks if you can, just to save you having to go back and forth to the menu to see all the options.
If your prefab is intended to be player explorable, you can add Sleepers too it with the editor. Adding sleepers is a 2 part process, first you need sleeper blocks. These control individual zombies/sleepers. Then you need to group your sleepers in Volumes to control group behaviour and when they spawn.
You can find the sleeper blocks in the Creative menu. There are 2 main types of sleeper blocks, the 1st is generic zombies and the 2nd is individual animal sleeper blocks. Although the zombie blocks all look the same the actual type of sleeper that zombie becomes is controlled by the Sleeper Volume. The blocks control where in your prefab zombie sleepers spawn and what “sleeping” position they will be in once spawned. They also control individual zombie sleeper behaviours like hearing and sight range, so you can set up monster closets. The animal sleeper blocks are a little different as these will determine what animal the sleeper becomes regardless of the volumes settings.
Once your sleeper blocks are placed you can start grouping them into Sleeper Volumes. If you go to the Level tools tab in the editors tab menu you will find a checkbox called “show Sleeper Volumes”. Once this is enabled you can start editing your volumes, you might not have any volumes in a new prefab and if that’s the case just load up another prefab that does and check the show volumes if it isn’t checked already.
Then you can simply left click on a volume and copy it CTRL + C then go back to your prefab and paste it anywhere CTRL + V. Alternatively there is a “cpy Sleeper Volume” button in the Level Tools tab that can do the same thing. Once you have a volume in your prefab you can just copy it to get more.
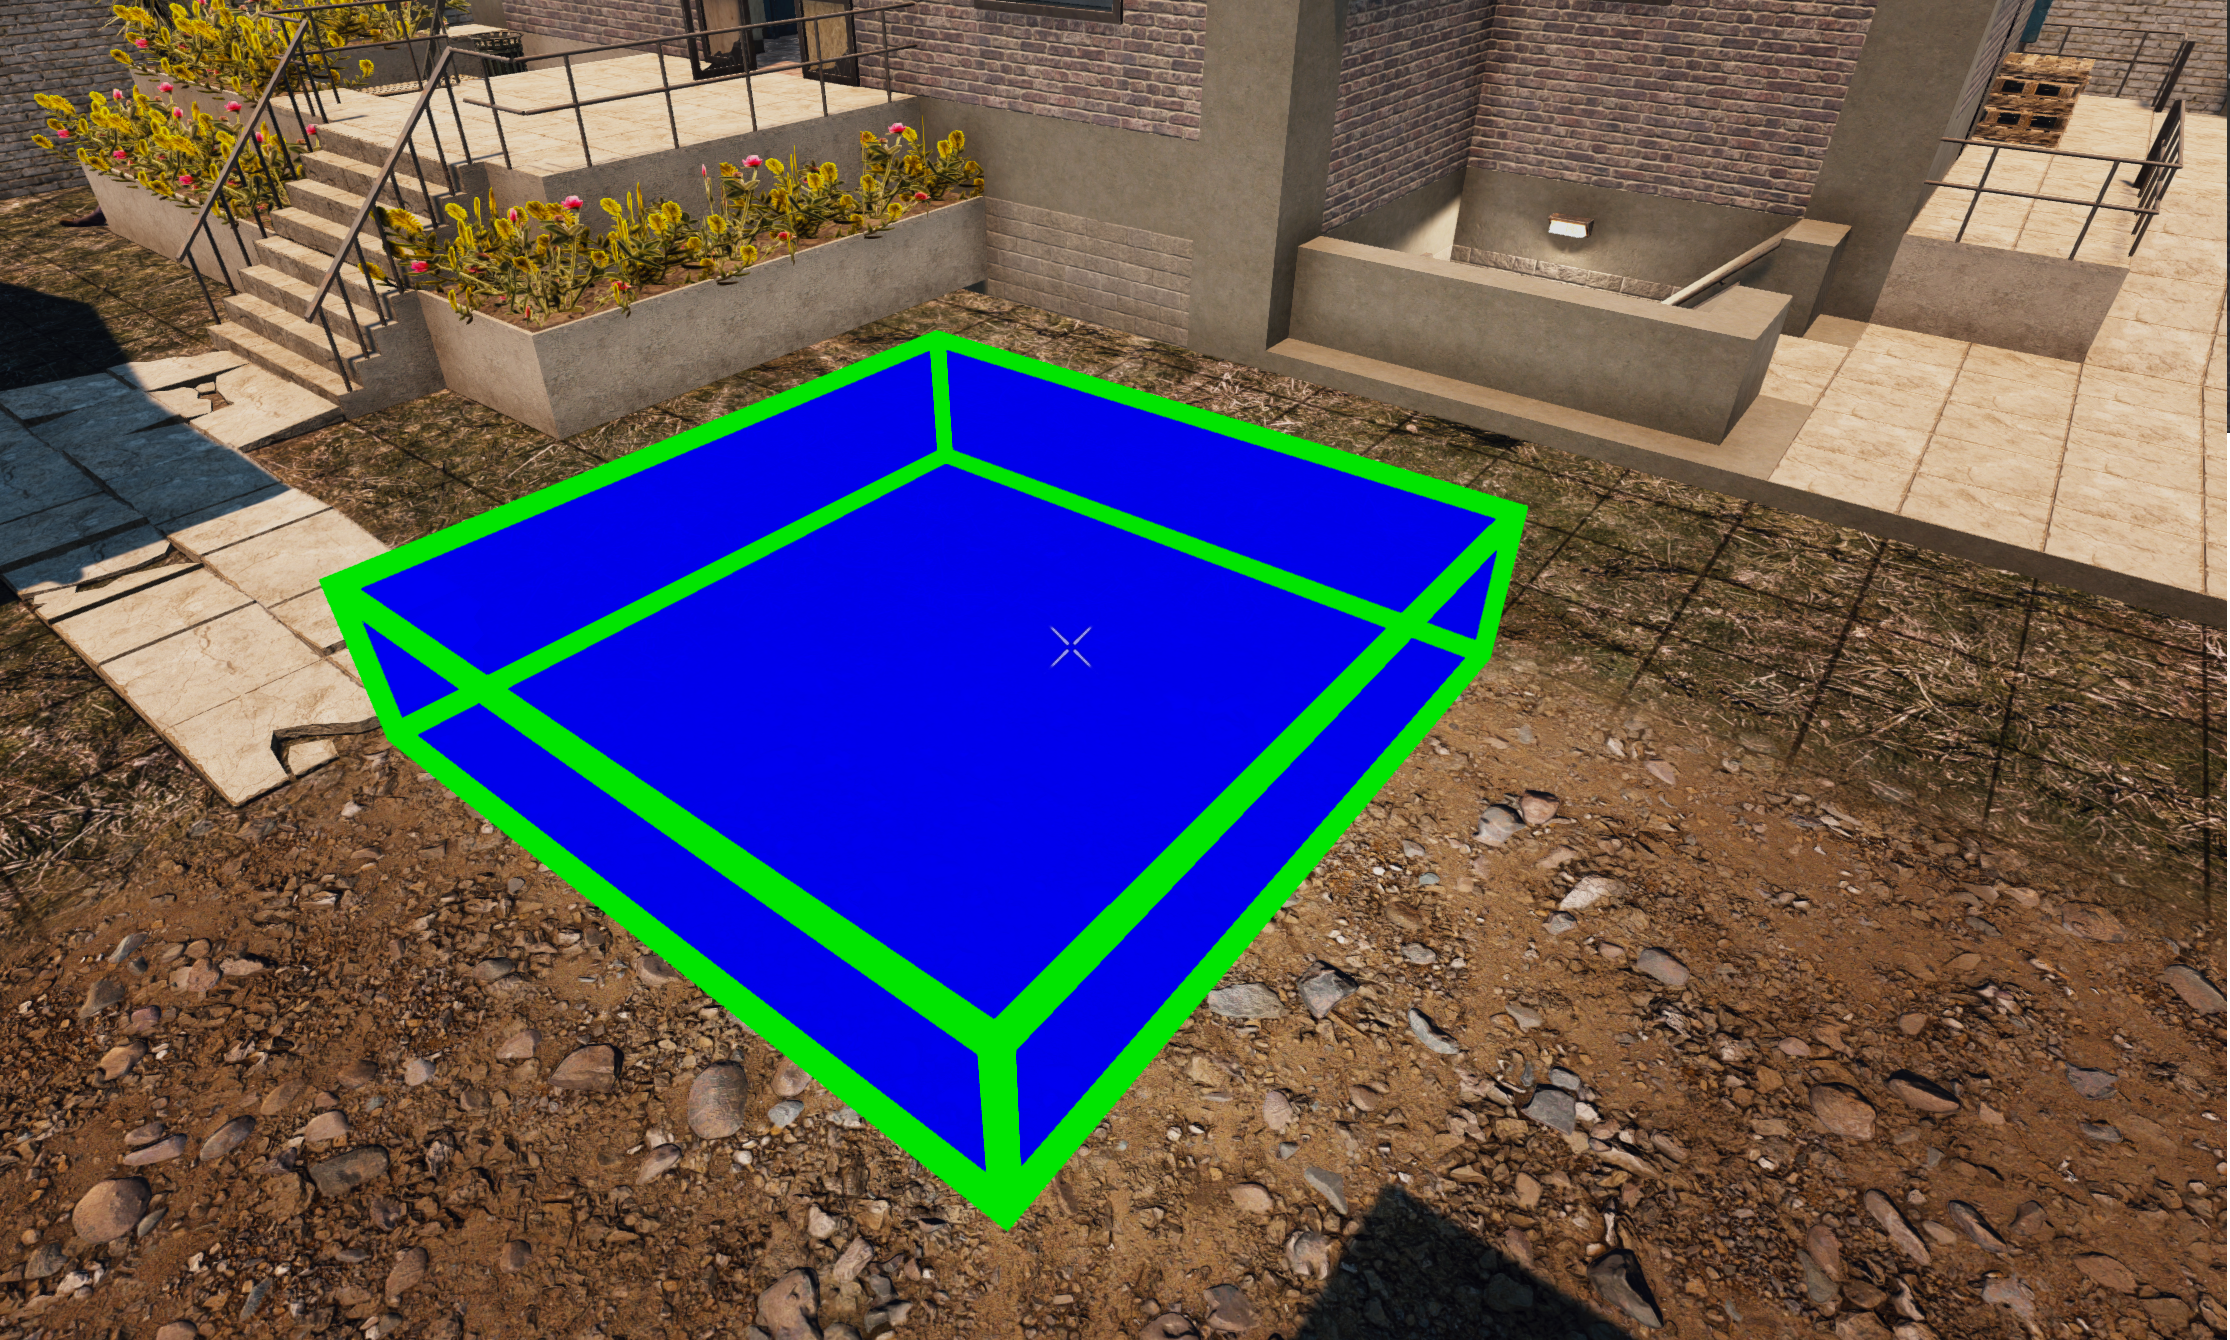
To change the volumes settings, left click on a volume and the edges will turn green. You can move the selected volume the same way as the selection box discussed earlier. If you press K you will get the sleeper volumes settings. Here you can select the group of the type of zombie you want to spawn, so if you wanted soldiers select “Group Zom Soldier”. You also need to specify how many zombies will spawn, i’d recommend you only spawn as many sleepers as you have sleeper blocks placed. The 2 boxes for “Spawn Count” are minimum and maximum. If you want a set number to spawn every time just set the same value in each box. If you want them to spawn in the same place every time enter the value of the total sleepers in the volume in spawn count boxes.
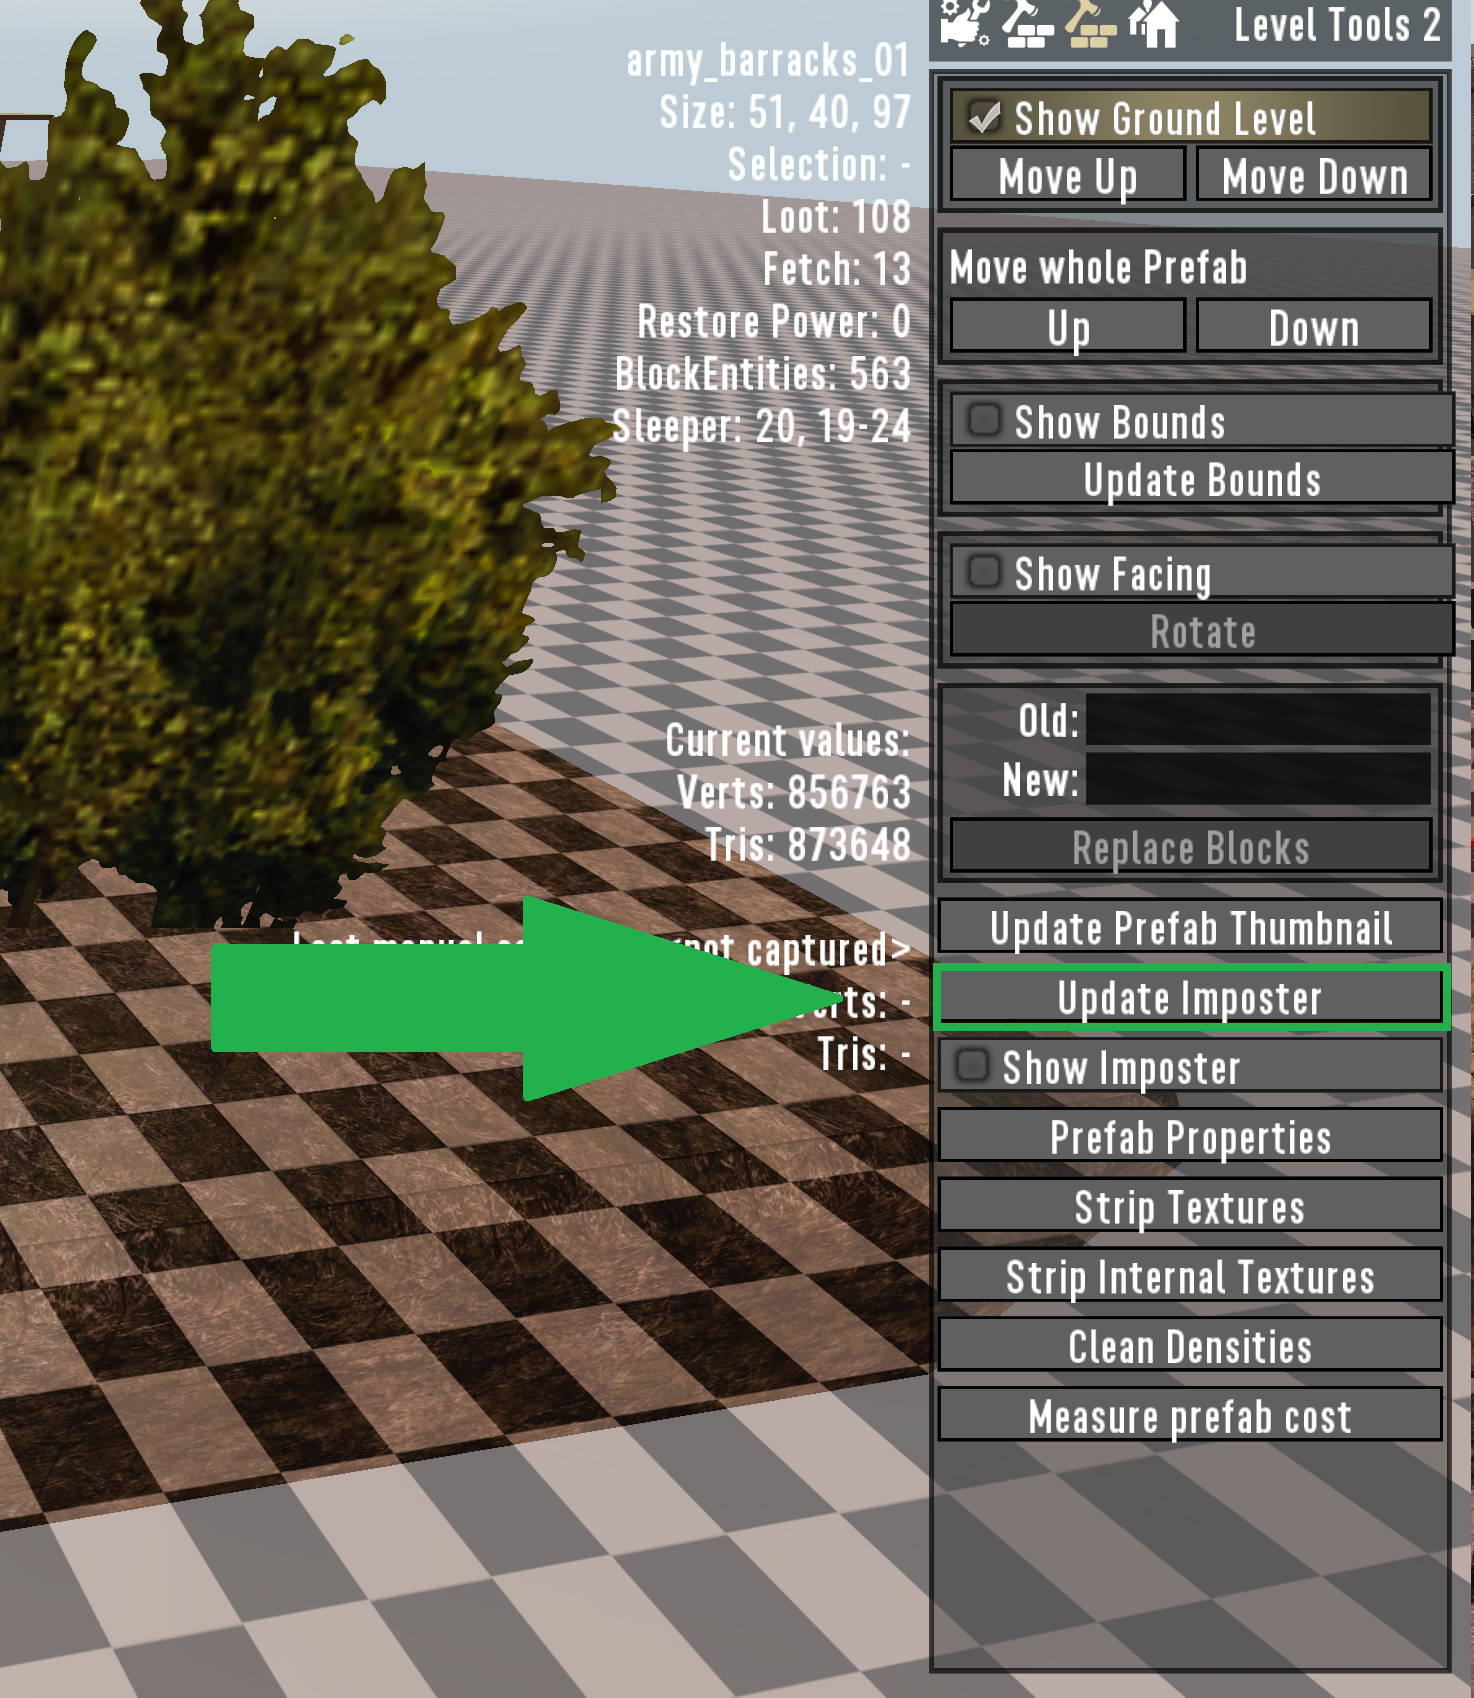
I’d recommend you do this part last. For the most part it’s a one click deal, however it might need some tweaking before hand. Before you click on “update Imposter” to create your mesh i’d recommend you make a backup first and make some edits before going ahead. You want the mesh to be essentially an empty shell, so block up any holes that are open into your prefab (Any Marble painted blocks work well). Another thing of note is terrain won’t “convert” and will simply disappear in the mesh. So if your prefab has raised terrain on the exterior, you will need to use conventional blocks and paints to approximate the terrain for the mesh.
Once your prefab is prepped and ready hit “update Imposter”. This will create a basic version of your prefab and if you sealed it up right, it will be hollow inside. Do NOT save while “show Imposter” is checked it will save the imposter over your actual prefab. Make sure the main prefab is loaded before saving. You can then rename the new .Mesh file if you made a new prefab version for the mesh creation.
These are new with A20, they allow players to open locked doors after pressing a switch or key activation. They can also be used to trigger traps to break to create ambushes.
For doors place your door, switch or key activator blocks and hold E on either. Assign a trigger group to it, this links the door and switch together so when you press the switch it opens that door. Make sure both your switch and door have the same group number. Doors also have some new options holding E in the “edit” menu. You can change the damage state with the upgrade/downgrade buttons, use a preset state and open or close it from here.
Traps are set up almost identically, place your activator block assign it a group number. Then press E (not holding it this time) and assign the same group to the trap. There are many different types of trap blocks available, search for “trap” in the creative menu to see all the options.
This is a nice easy option for getting the prefab to spawn in RWG. Click on the “Prefab Tags” button in the tab level tools 2. Here you will see all the available tags that tell world generation which group of prefabs it should be spawned with. Select the tag appropriate for your prefab and hit save. If you generate a new world your new prefab should be included in the new worlds prefabs.xml after generation.
For trader POI’s you can add a trader by going into the creative menu and search for “trader” find the trader block and place where you want your trader to spawn (in A20 the icon is the old trussing ramp block and the model is a battery bank) Once you have it placed to choose which trader will spawn mouse over the block and press SHIFT + ALT + Right Mouse Button for the trader selection menu.
Traders will face this direction when spawned.
You can add various decals to terrain blocks by mousing over the block you wish to add it to and pressing SHIFT + ALT + Right Mouse Button Enter a id from 0-15 to add that decal.
Z – Place a section box, Use again to define the size. (Defining 2 opposing corners)
U – Creative Menu , You can get all your blocks here.
X – Rotate a selection.
G – Hold to move a selection, use WASD and C for down and space for up. You can also drag the arrows in the centre of the selection box.
CTRL + C – Copy everything in a selection box.
CTRL + SHIFT + V – Paste a preview of the copied selection, Use again to paste.
CTRL + Z – Undo Hotkey.
CTRL + Y – Redo Hotkey.
CTRL + V – Paste contents of a copied selection.
CTRL + G – Mirror a selection by clicking the arrows in the direction you wish to mirror in.
l – Fill a selection with the block selected in your toolbelt.
J – Fill a selection with air.
BACKSPACE – Remove a selection box.
Hold SHIFT – To focus on block you’re looking at.
SHIFT + Left Mouse – Deletes focused block.
F3 – Shows the Debug Window, You can use this to find a blocks name holding Shift to focus on it.
Middle Mouse Button or left CTRL – Puts a stack of 99 blocks that are under your cursor.
K – opens properties menu, You can use this to spawn another prefab into the current prefab.
SHIFT + Arrow Keys – Change the block density of the selected block. This is used to create “smoother terrain” in a prefab.
ESC – Brings up the tab menus and save.
CTRL + Z – Undo.
SHIFT + ALT + RIGHT MOUSE BUTTON – Advanced menu for trader blocks and terrain decals.
When you press ESC you get this menu. On the top left you have the usual options and can save the prefab here. The help button will show you some of the keybinds, there are some more in options>controls.
The text on the far right before the tab menus shows the following from top to bottom. prefabs name, size of the prefab, size of the current selection, prefabs loot, Fetch is the number of quest fetch loot blocks in the prefab, restore power is something to do with electricity wiring but as far as i know saving wiring in a prefab is still WIP. Block entities is the number of blocks like draw bridges,doors , blocks with animations essentially. Sleeper shows 2 things. The first number is number of sleeper volumes and the second is minimum and maximum sleepers spawned.
This tab has many of the options you may already be familiar with such as Fly mode, Physics check boxes etc. You also have several new options such as the Playtest button which loads you & your prefab into an empty world to test sleepers, random helper blocks, stability, etc.
You can also use the time slider to see how the prefab looks at night to test lights. You’ll usually only use Playtest and the time slider on this tab.
I wouldn’t advise turning physics on inside the editor in case it all collapses. The show stability options only works with physics on so don’t worry about those.
You can also ignore invisible & teleport since the area is really small you can zip around with SHIFT + Q easily.
I’ve found the recalc & reload chunks options don’t work as well as simply saving and reloading the prefab, so you likely won’t use those.
The level tools tab allows you to show/hide specific things like sleeper volumes boxes, terrain blocks, paintable & unpaintable blocks etc.
When you add sleeper volumes to a prefab you will need to come here first to show sleeper volumes as they are hidden by default.
There are also some buttons at the bottom, clear/fill selection can also be done with a hotkey so you likely won’t need them here.
The Rnd Decorate Sel. Button however has no hot key. This is like the fill function but instead of filling the entire selection with the block in your tool belt it only fills 10% of the area. This option can be used to “Scatter” blocks like trees or decal blocks.
The cpy sleeper volume is how you create new volumes. Select a volume and press the button, another volume will appear above.
Finally the undo/redo buttons. These give a bit of false security because they can’t undo everything (So make frequent backups!) You can also undo with the hotkey CTRL + Z
They can undo placed blocks, painted blocks,pasted blocks but it cannot undo rotating or deleting blocks with the admin guns/tools
The 2nd level tools tab has lots of useful options, so starting from the top we have Ground level and Move Whole Prefab.
Show Ground Level is hidden by default so you may wish to enable it when first starting a prefab so you always know where to build.
You cannot build under the editors world. So to have an underground area on a prefab you will either need to start the build with the underground part first, then move the ground level up to where it needs to be.
The second option is to move the whole prefab up, if you wanted to add an underground area to an existing prefab.
Show bounds, shows the prefabs dimensions in a visual green box. This can be useful when the prefab is set to copy air blocks and you have 1 stray block cutting a whole wall of air into the world. You can use this to check where the offending block is.
Show Facing tells you which direction your prefab faces North/South, East/west and you can rotate the direction here. This is direction the prefab faces when spawned into a world.
Next up is the replace blocks function. This can be very useful if you want to swap a specific block for another or remove it replacing it with air. It will work on the whole prefab or if you have a selection box selected it will only apply to that area. Something important to note, the block names are not the names as displayed ingame. It uses the block names defined in Blocks.xml. So if you wanted to replace air with stone, it won’t work if you type stone but will if you type terrstone. You can find the actual names of block in 2 ways.
First, quickest is to press F3 and mouse over the block holding SHIFT. The block name will be displayed in the upper left, however that ui element has really bad scaling at higher resolutions. So if you’re using 1440P or higher you may need to lean in to be able to read it. The second way is reading directly from the aforementioned blocks.xml, using something like Notepad++ and searching using CTRL + F. Then simply type/copy into the ingame replace blocks text box. You can find normally the file here: C:\Program Files (x86)\Steam\steamapps\common\7 Days To Die\Data\Config\blocks.xml
Hight Blocks Works much like replace blocks but only visually highlights the specified block so you can easily find where that block is being used.
The update Prefab Thumbnail button will take a quick screenshot and set it as the prefabs thumbnail. It auto hides the hud and allows you to create a quick basic thumbnail. However you can create your own image as long as its a jpg and it any resolution however it is displayed in a 4:3 aspect ratio so the image must also be a 4:3 aspect ratio. Then simply name the image the name of your prefab and move it into your prefab folder.
Next up is the Impostor button. This is how the distant mesh for the prefab is created. It essentially creates a basic “low Res/cost” version of your prefab. when you press it, it will swap out all the expensive blocks with complicated meshes with basic blocks, Draw bridges will become wood blocks for example. It works quite well, however it’s a good idea to create a duplicate of the prefab to create an impostor build version. You can wall off any holes into your prefab with dark painted blocks. The goal is to make it completely hollow, getting rid of everything that’s unnecessary . We only need it to be a basic shell. As long as there are no holes into your prefab it should generate a nice hollow mesh for you. Another note, at the moment terrain blocks will be removed completely by the mesh generator. So if your prefab has terrain that will be visible from a distance, you will need to swap them out in your mesh build version for basic cube and ramp etc blocks. Just don’t save your prefab with the show impostor box checked, it will save the mesh version over your main version, so when you next load it up it will only be the impostor blocks with show impostor on or off.
Strip Textures will remove any paint that has been applied to blocks (they will revert to how they were by default) It also works with selections. Strip Internal Textures as far as i can tell doesn’t do anything at the moment. It may be WIP ground work for a new function in a later version.
Clean density’s is similar to Strip Textures but it wipes block density’s instead of paint textures and finally Measure Prefab Costs is like a prefab performance benchmark. It displays the total vertices & triangles in your prefab, the lower these values the better it is for performance. A “vertex” or “vertices” if more than 1, is where 2 sides of a triangle meet. These are basically the corners of polygons. A “tri” or triangular polygon is a 3 sided polygon, these types of polygons are used for complex models like zombies, traders,weapons and drawbridges etc. simpler models like a wood block are made up of “quad’s” or “quadrilateral polygons” where each face of the block is a four sided polygon. That is why simple blocks are “cheaper” since they’re only 6 quads totalling 24 vertices. Where as something like an npc or zombie may only be made up of tris with 1 less vertices per polygon compared to a quad polygon but they have hundreds to thousands of tris.
On the final tab is the prefab browser. You can load prefabs from here by selecting a prefab from the list, either by searching or directly from the list. You can also filter the list by group at the top. Then simply click load.
With a prefab selected the Props button will open the prefabs properties without loading it. Here you can assign it to an existing group or create a new group for it. You can also open it in an external editor like Notepad++ from here.
The 2 other grey out buttons are for loading a existing prefab into your current one. First you place a selection, you can then go to the menu again and select a prefab. After you find the prefab you want to load into yours click the now unlocked Load Into button.
Once you press it after you have your selection down it will display a green selection box and the Place Prefab button will now be unlocked. Once you’re happy with the position press the Place Prefab button. You may need to save and reload for it to update but it should have pasted the prefab into yours.
The final button on the bottom creates a new prefab in a fresh empty world.
To place it, make sure the servers world is installed on your local machine