


[vc_row][vc_column][vc_column_text]
Keybinds
Z – Place a section box, Use again to define the size. (Defining 2 opposing corners)
U – Creative Menu , You can get all your blocks here.
X – Rotate a selection.
G – Hold to move a selection, use WASD and C for down and space for up. You can also drag the arrows in the centre of the selection box.
CTRL + C – Copy everything in a selection box.
CTRL + SHIFT + V – Paste a preview of the copied selection, Use again to paste.
CTRL + Z – Undo Hotkey.
CTRL + Y – Redo Hotkey.
CTRL + V – Paste contents of a copied selection.
CTRL + G – Mirror a selection by clicking the arrows in the direction you wish to mirror in.
l – Fill a selection with the block selected in your toolbelt.
J – Fill a selection with air.
BACKSPACE – Remove a selection box.
Hold SHIFT – To focus on block you’re looking at.
SHIFT + Left Mouse – Deletes focused block.
F3 – Shows the Debug Window, You can use this to find a blocks name holding Shift to focus on it.
Middle Mouse Button or left CTRL – Puts a stack of 99 blocks that are under your cursor.
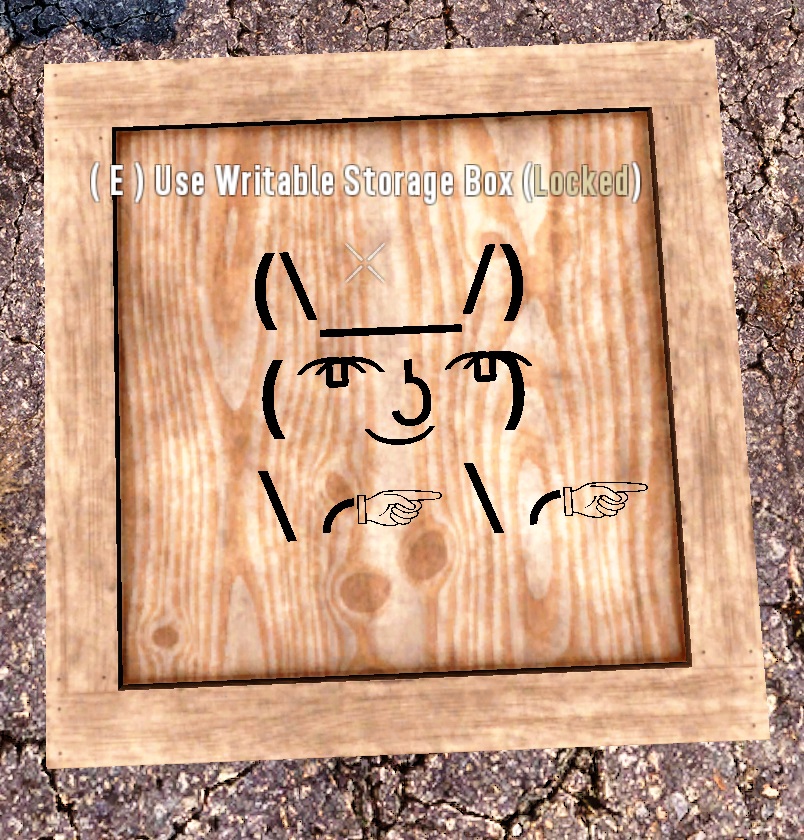
K – opens properties menu, You can use this to spawn another prefab into the current prefab.
SHIFT + Arrow Keys – Change the block density of the selected block. This is used to create “smoother terrain” in a prefab.
ESC – Brings up the tab menus and save.
CTRL + Z – Undo.
SHIFT + ALT + RIGHT MOUSE BUTTON – Advanced menu for trader blocks and terrain decals.
Basic Overview

When you press ESC you get this menu. On the top left you have the usual options and can save the prefab here. The help button will show you some of the keybinds, there are some more in options>controls.
The text on the far right before the tab menus shows the following from top to bottom. prefabs name, size of the prefab, size of the current selection, prefabs loot, Fetch is the number of quest fetch loot blocks in the prefab, restore power is something to do with electricity wiring but as far as i know saving wiring in a prefab is still WIP. Block entities is the number of blocks like draw bridges,doors , blocks with animations essentially. Sleeper shows 2 things. The first number is number of sleeper volumes and the second is minimum and maximum sleepers spawned.
Tab Menus (Going From left To Right)
Tab 1/4 Debug Tools

This tab has many of the options you may already be familiar with such as Fly mode, Physics check boxes etc. You also have several new options such as the Playtest button which loads you & your prefab into an empty world to test sleepers, random helper blocks, stability, etc.
You can also use the time slider to see how the prefab looks at night to test lights. You’ll usually only use Playtest and the time slider on this tab.
I wouldn’t advise turning physics on inside the editor in case it all collapses. The show stability options only works with physics on so don’t worry about those.
You can also ignore invisible & teleport since the area is really small you can zip around with SHIFT + Q easily.
I’ve found the recalc & reload chunks options don’t work as well as simply saving and reloading the prefab, so you likely won’t use those.
Tab 2/4 Level Tools
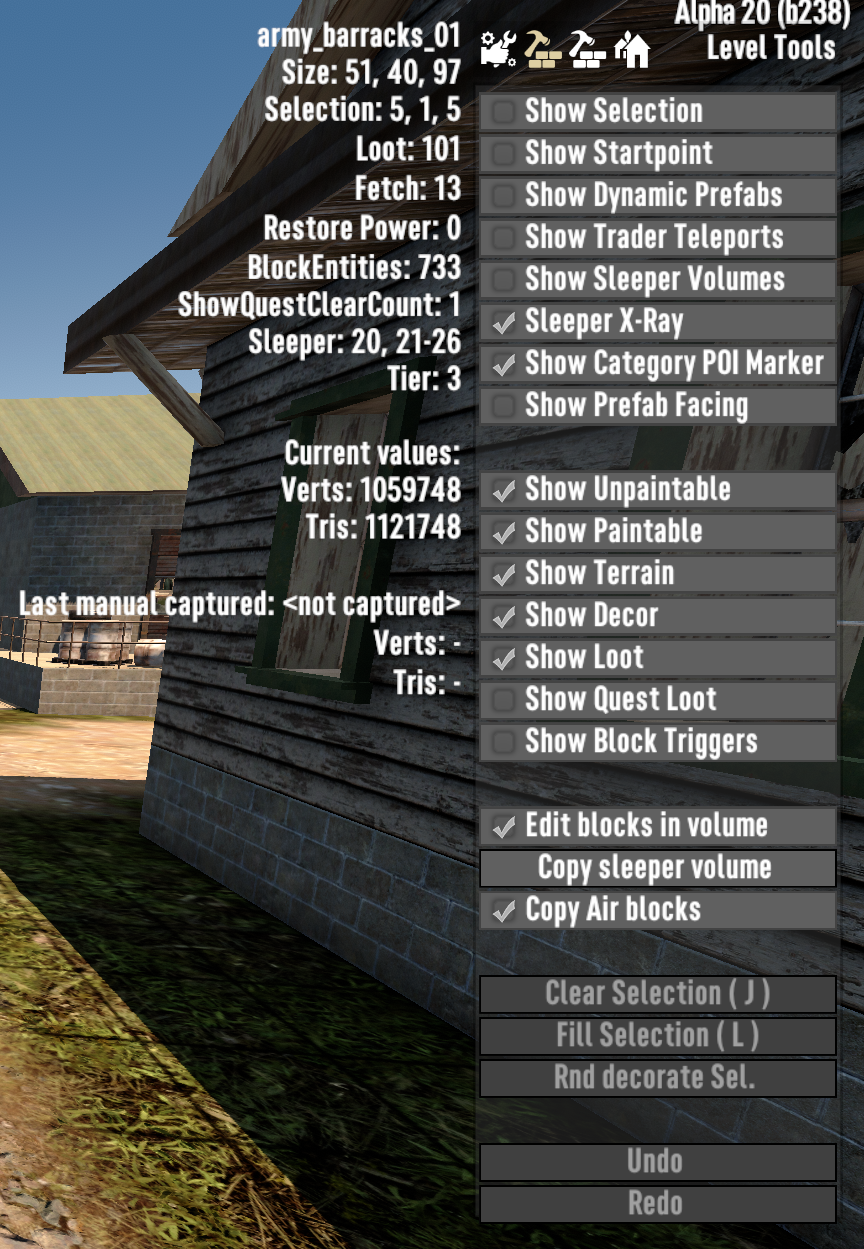
The level tools tab allows you to show/hide specific things like sleeper volumes boxes, terrain blocks, paintable & unpaintable blocks etc.
When you add sleeper volumes to a prefab you will need to come here first to show sleeper volumes as they are hidden by default.
There are also some buttons at the bottom, clear/fill selection can also be done with a hotkey so you likely won’t need them here.
The Rnd Decorate Sel. Button however has no hot key. This is like the fill function but instead of filling the entire selection with the block in your tool belt it only fills 10% of the area. This option can be used to “Scatter” blocks like trees or decal blocks.
The cpy sleeper volume is how you create new volumes. Select a volume and press the button, another volume will appear above.
Finally the undo/redo buttons. These give a bit of false security because they can’t undo everything (So make frequent backups!) You can also undo with the hotkey CTRL + Z
They can undo placed blocks, painted blocks,pasted blocks but it cannot undo rotating or deleting blocks with the admin guns/tools
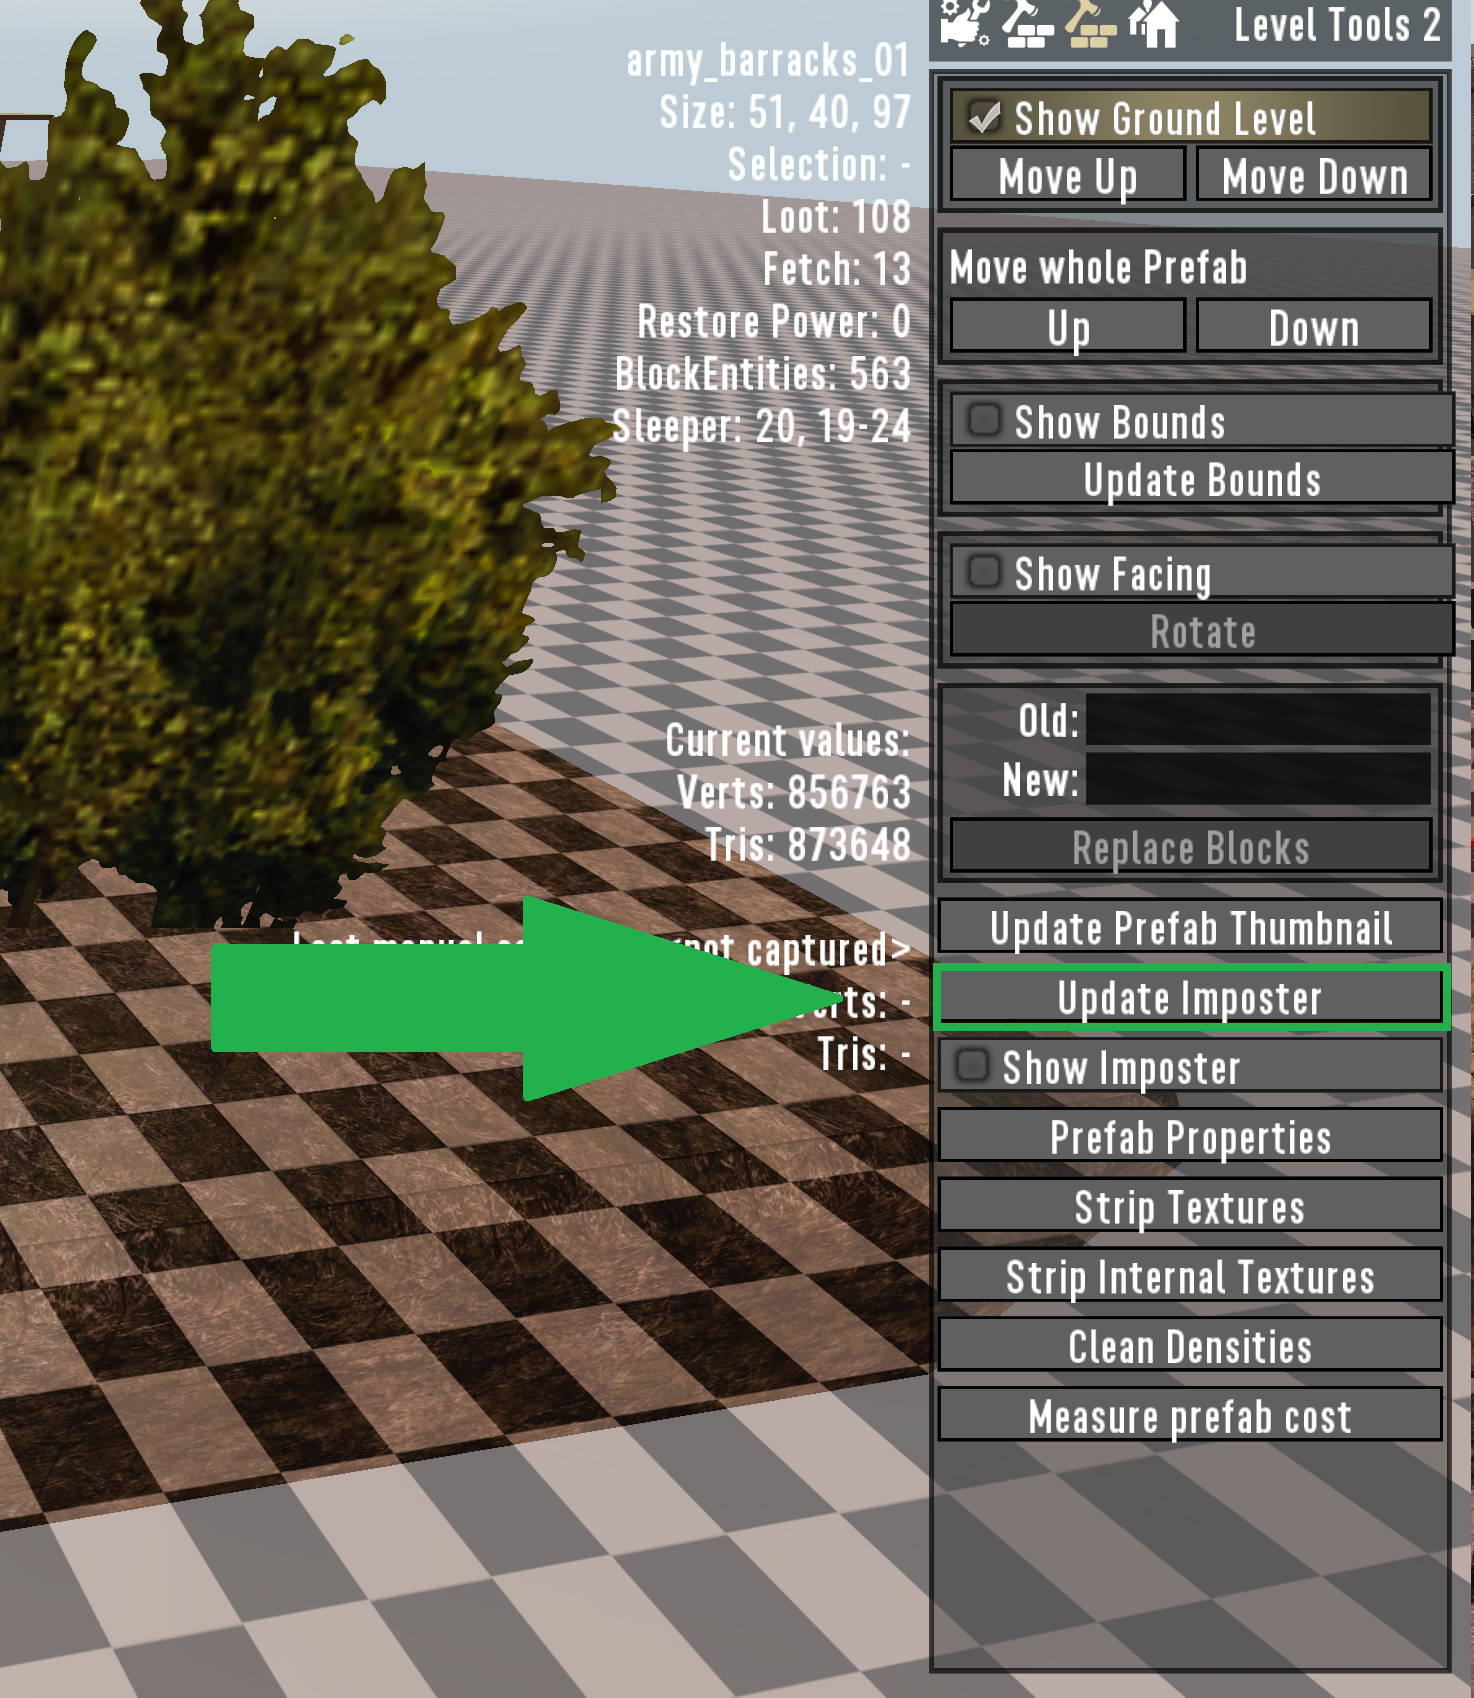
Tab 3/4 Level Tools 2
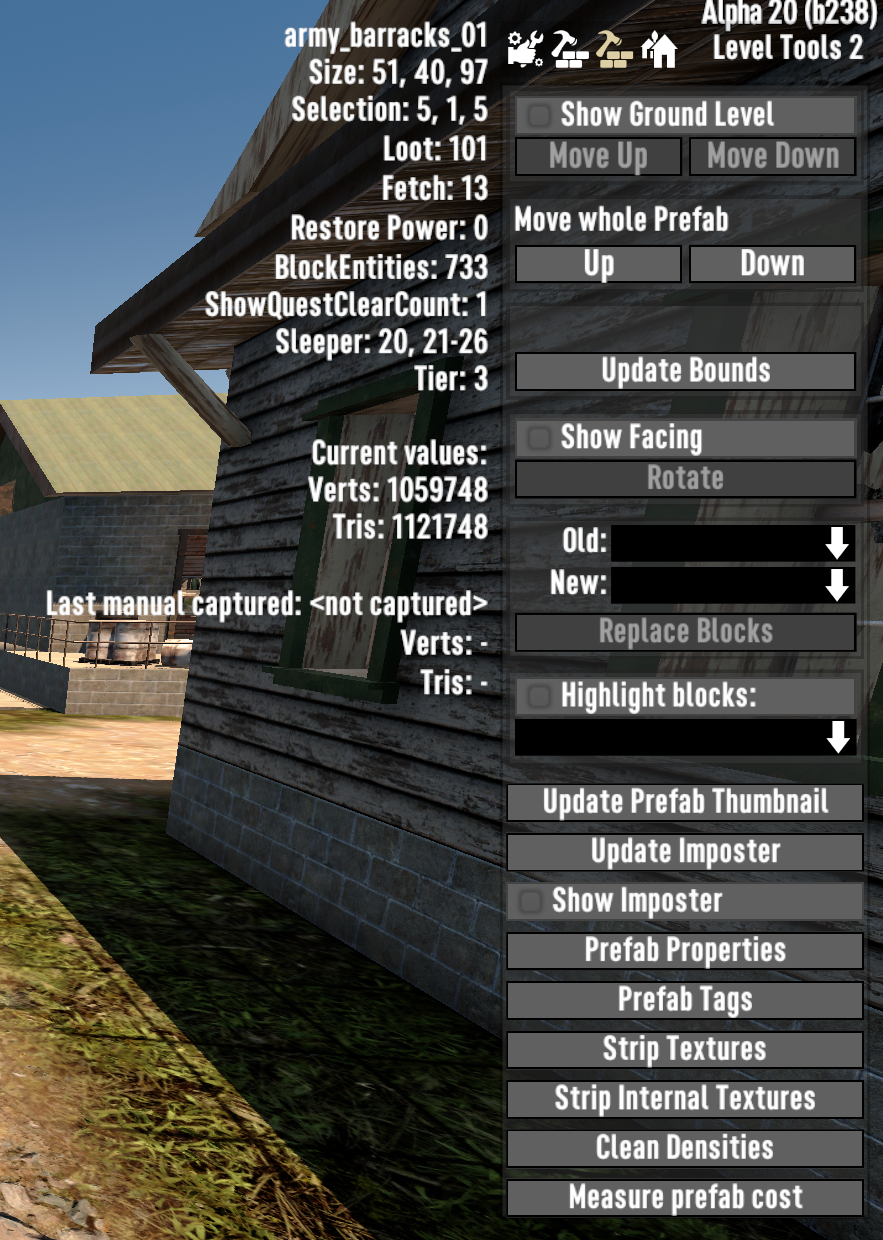
The 2nd level tools tab has lots of useful options, so starting from the top we have Ground level and Move Whole Prefab.
Show Ground Level is hidden by default so you may wish to enable it when first starting a prefab so you always know where to build.
You cannot build under the editors world. So to have an underground area on a prefab you will either need to start the build with the underground part first, then move the ground level up to where it needs to be.
The second option is to move the whole prefab up, if you wanted to add an underground area to an existing prefab.
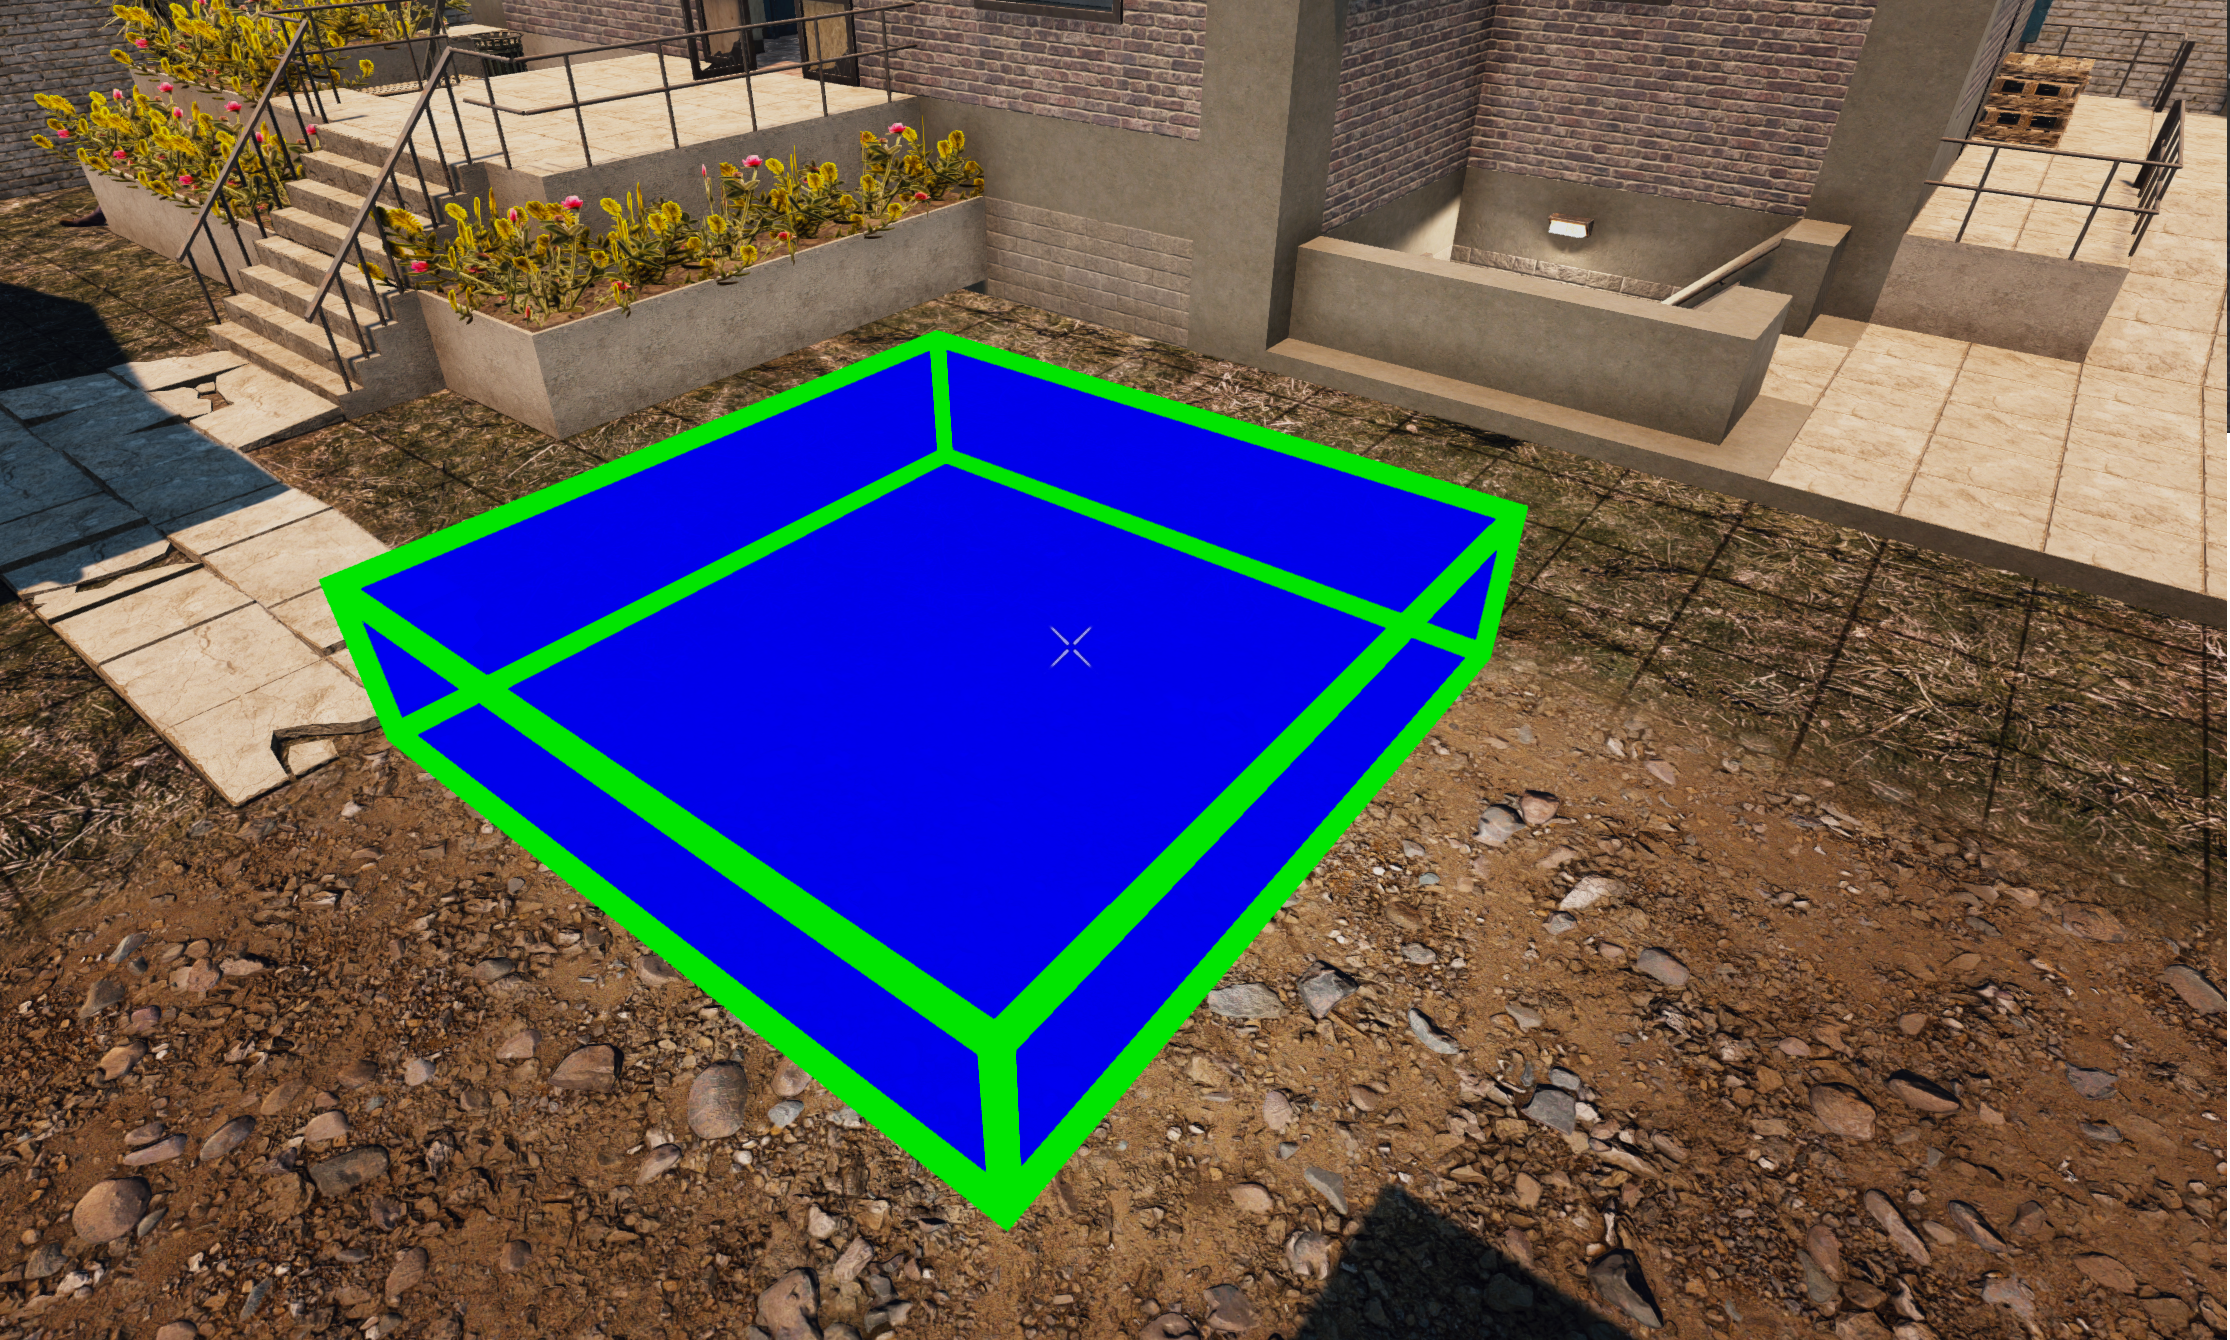
Show bounds, shows the prefabs dimensions in a visual green box. This can be useful when the prefab is set to copy air blocks and you have 1 stray block cutting a whole wall of air into the world. You can use this to check where the offending block is.
Show Facing tells you which direction your prefab faces North/South, East/west and you can rotate the direction here. This is direction the prefab faces when spawned into a world.
Next up is the replace blocks function. This can be very useful if you want to swap a specific block for another or remove it replacing it with air. It will work on the whole prefab or if you have a selection box selected it will only apply to that area. Something important to note, the block names are not the names as displayed ingame. It uses the block names defined in Blocks.xml. So if you wanted to replace air with stone, it won’t work if you type stone but will if you type terrstone. You can find the actual names of block in 2 ways.
First, quickest is to press F3 and mouse over the block holding SHIFT. The block name will be displayed in the upper left, however that ui element has really bad scaling at higher resolutions. So if you’re using 1440P or higher you may need to lean in to be able to read it. The second way is reading directly from the aforementioned blocks.xml, using something like Notepad++ and searching using CTRL + F. Then simply type/copy into the ingame replace blocks text box. You can find normally the file here: C:\Program Files (x86)\Steam\steamapps\common\7 Days To Die\Data\Config\blocks.xml
Hight Blocks Works much like replace blocks but only visually highlights the specified block so you can easily find where that block is being used.
The update Prefab Thumbnail button will take a quick screenshot and set it as the prefabs thumbnail. It auto hides the hud and allows you to create a quick basic thumbnail. However you can create your own image as long as its a jpg and it any resolution however it is displayed in a 4:3 aspect ratio so the image must also be a 4:3 aspect ratio. Then simply name the image the name of your prefab and move it into your prefab folder.
Next up is the Impostor button. This is how the distant mesh for the prefab is created. It essentially creates a basic “low Res/cost” version of your prefab. when you press it, it will swap out all the expensive blocks with complicated meshes with basic blocks, Draw bridges will become wood blocks for example. It works quite well, however it’s a good idea to create a duplicate of the prefab to create an impostor build version. You can wall off any holes into your prefab with dark painted blocks. The goal is to make it completely hollow, getting rid of everything that’s unnecessary . We only need it to be a basic shell. As long as there are no holes into your prefab it should generate a nice hollow mesh for you. Another note, at the moment terrain blocks will be removed completely by the mesh generator. So if your prefab has terrain that will be visible from a distance, you will need to swap them out in your mesh build version for basic cube and ramp etc blocks. Just don’t save your prefab with the show impostor box checked, it will save the mesh version over your main version, so when you next load it up it will only be the impostor blocks with show impostor on or off.
Strip Textures will remove any paint that has been applied to blocks (they will revert to how they were by default) It also works with selections. Strip Internal Textures as far as i can tell doesn’t do anything at the moment. It may be WIP ground work for a new function in a later version.
Clean density’s is similar to Strip Textures but it wipes block density’s instead of paint textures and finally Measure Prefab Costs is like a prefab performance benchmark. It displays the total vertices & triangles in your prefab, the lower these values the better it is for performance. A “vertex” or “vertices” if more than 1, is where 2 sides of a triangle meet. These are basically the corners of polygons. A “tri” or triangular polygon is a 3 sided polygon, these types of polygons are used for complex models like zombies, traders,weapons and drawbridges etc. simpler models like a wood block are made up of “quad’s” or “quadrilateral polygons” where each face of the block is a four sided polygon. That is why simple blocks are “cheaper” since they’re only 6 quads totalling 24 vertices. Where as something like an npc or zombie may only be made up of tris with 1 less vertices per polygon compared to a quad polygon but they have hundreds to thousands of tris.
Tab 4/4 Prefab Browser
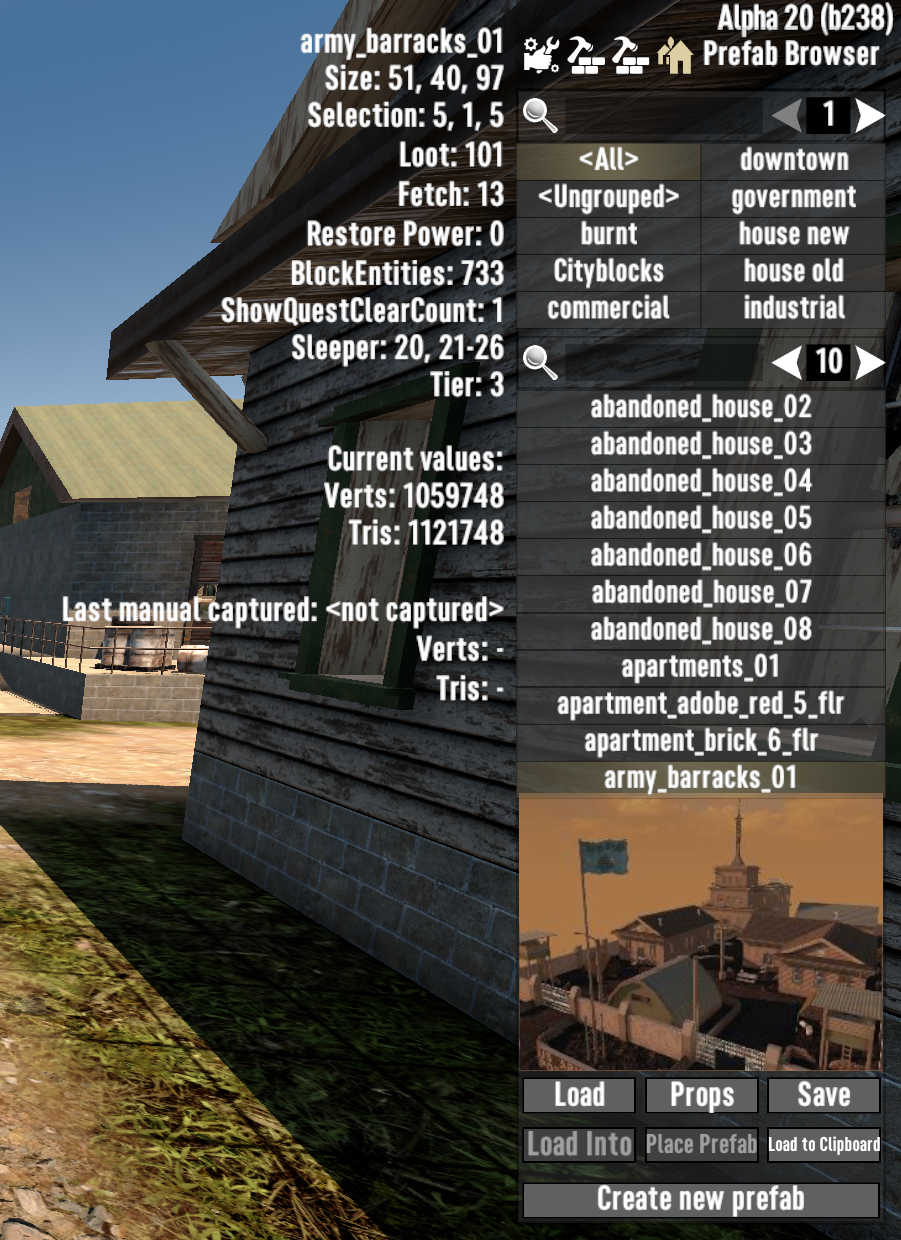
On the final tab is the prefab browser. You can load prefabs from here by selecting a prefab from the list, either by searching or directly from the list. You can also filter the list by group at the top. Then simply click load.
With a prefab selected the Props button will open the prefabs properties without loading it. Here you can assign it to an existing group or create a new group for it. You can also open it in an external editor like Notepad++ from here.
The 2 other grey out buttons are for loading a existing prefab into your current one. First you place a selection, you can then go to the menu again and select a prefab. After you find the prefab you want to load into yours click the now unlocked Load Into button.
Once you press it after you have your selection down it will display a green selection box and the Place Prefab button will now be unlocked. Once you’re happy with the position press the Place Prefab button. You may need to save and reload for it to update but it should have pasted the prefab into yours.
The final button on the bottom creates a new prefab in a fresh empty world.
Community Discord
[/vc_column_text][/vc_column][/vc_row]